Upgrading to Openbravo 3

Now it is one month since Openbravo 3 was Generally Available released.

But what about people using Openbravo 2.50? Should they continue using 2.50 for the next few years? The answer is NO…  Now it is very easy to upgrade to Openbravo 3 for all of them!

From 2.50 MP31 (which is currently in  QA Approved maturity status, learn more) upgrade using ERP’s user interface is supported. We have worked hard to provide an easy upgrade path. Being in 2.50 MP31 or higher, after Scanning for updates you will find, in addition to he updates for your modules, upgrade to Openbravo 3. Upgrade is a new flow (similar to update) that will guide you through the steps required to end up with your instance in the new major version. Even “upgrade” can sound as very a difficult and complex task, I suggest you to try it and realize how it is possible to do it in matter of some hours. Here, you can find detailed documentation on this process.

MMC Upgrade

But this is not all the good news:

  • We wanted to make Openbravo 3 as accessible as possible, so 2.50 MP31 has been released as a Community version, this means Community Edition 2.50 instances will be able to easily update to this version through user interface.
  • For professional subscribers, there is also available an upgrade for the Openbravo Appliance.
Enjoy Openbravo 3!

Notes: a new feature for Openbravo 3RC6

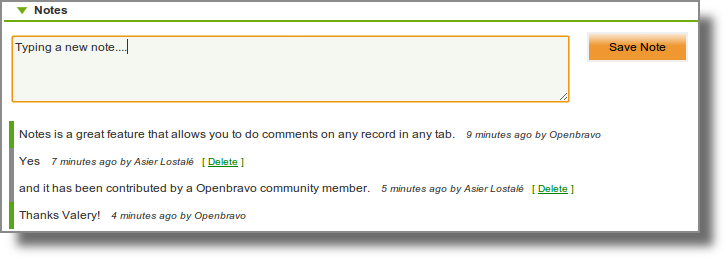
Notes is a new feature that has just been added to Openbravo and will be released within the next Openbravo 3RC6 which will be soon available.

This feature adds a new section to all forms that allows to insert comments for any record in a really simple way.

Notes has been contributed to Openbravo by Valery Lezhebokov, an active community member.

Once again, thank you Valery!

Openbravo ERP HQL prototyping: Hibernate Tools

Note: In Openbravo 3 we upgraded Hibernate library to 3.6.x version. It seems this new version of Hibernate is not already supported by Hibernate Tools Eclipse’s plugin. So till they support it, Openbravo developers will not be able to use it 😦


With the inclussion of DAL in 2.50, Openbravo ERP provides a hibernate layer for accessing database. Complex queries can be executed in database using HQL. The purpose of this post is to explain how to configure Hibernate Tools to help to write HQL queries for Openbravo model.

Why

Before DAL, Openbravo’s database was always accessed using sqlc; this consists on writing SQL statements in a XML file that is transformed into a Java class to execute these queries exactly as they were written. Queries were typically prototyped in a database client (such as pgAdmin or SQL Developer) before moving them to XSQL files. These clients offer some advantages such as syntax checking, code completion and query execution which allows you to see whether the query works as you expected.

Now, with DAL there are other ways of prototyping.

HQL Query Tool is an Openbravo ERP module which facilitates this task using DAL. It is a nice tool where you can prototype HQL queries, execute them to see the result and see the properties each entity in Openbravo ERP has.

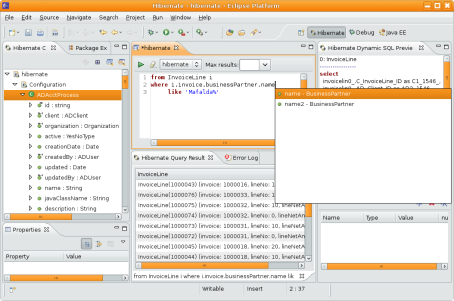
Hibernate Tools is an Eclipse plugin which can be easily configured to work together with Openbravo ERP. In addition to the advantages HQL Query Tool module has, this plugin offers code completion, which is really great. It also shows while you are typing your HQL query, the SQL that Hibernate will execute.

Hibernate Tools installation

The installation is really simple:

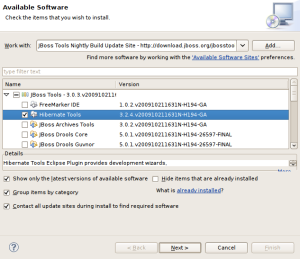
  1. Go to Help > Install New Software… > Add… and include this update site http://download.jboss.org/jbosstools/updates/stable.
  2. Select Hibernate tools and install it.

You can read additional information in the Hibernate Tools Reference Guide.

Configuration

Now it’s time to configure it to work with Openbravo ERP.

  1. Edit Openbravo.properties file and set hibernate.hbm.file property. This will generate the mapping file, if it is not set it is generated in memory but not persisted. You must set here a file within your Openbravo Eclipse’s project, for example path_to_your_OB_sources/config/ob.hbm.xml. Compile the application (ant smartbuild) or copy Openbravo.properties to WebContent/WEB-INF.
  2. Start Openbravo ERP, this will generate the file set in the previous step. Refresh project if you don’t have auto refresh set.
  3. Configure hibernate.cfg.xml file. There is a template for this file in config/eclipse directory, just copy it and edit to set your database properties. Note for Oracle users: hibernate.default_schema property must be set like your database username in upper case.
  4. Open Hibernate Perspective. Window > Open Perspective > Other… > Hibernate.
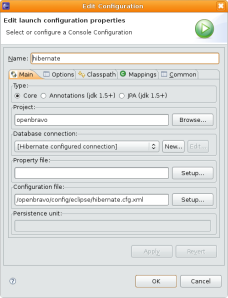
  5. In Hibernate Config view click on Add Configurationbutton. Complete the following parameters:
    • Project: openbravo
    • Configuration file: select your hibernate.cfg.xml file.
    • In Mappings tab add your hbm file (the one configured in step 1).

Prototyping HQL

Now you can start prototyping HQL. Click on the Open HQL Editor button in the Hibernate Config view and a HQL editor form will be open, there you can type your query with code completion, execute it to view the results (Hibernate Query Result view), view the generated SQL (Hibernate Dynamic SQL Preview view), see all the entities with their properties (Hibernate Config view, Configuration folder), etc.


Base References in Modules

Openbravo ERP 2.50MP12 is about to be released, one of the new cool features it includes is the capability of defining new Application Dictionary Base References within modules.

Application Dictionary References is the way Openbravo ERP defines data type of columns and how is rendered the UI for them. Before 2.50MP12, modules were not allowed to add base references, they only could use the ones provided by core and create new sub-references for these ones. This means that the UI and behavior for all fields in generated windows was set by the references in core, being impossible to define new ones in modules implementing different UI and behavior. The only way to perform all of this was creating manual windows where you are free to implement whatever you need, but as counterpart you loose the maintainability of having windows defined in Application Dictionary.

This limitation has now been broken. You can create base references in your module, which will allow to integrate within generated windows elements having new UI and behaving in a different way than the ones predefined in core.

UI selector

As a first example of how this new capability can improve Openbravo ERP usability you can take a look at the new UI Selector, which through a module (available as commercial) implements a completely new UI for selectors. Being also the first module that integrates SmartClient within generated windows.

Modularity naming rules adjustments

This message is VERY IMPORTANT for all of you developing and maintaining modules. Please read it carefully to adapt your modules to the new rules.

Recently some adjustments in modularity naming rules have been performed in order to prevent possible naming clashes between different modules. These changes have been now applied in pi mercurial repository and they will be released in next Openbravo ERP 2.50MP10 version. Before this, it is recommendable to adapt modules to this adjustments.

Existent modules that do not fit the new rules will raise warning when compiling but they will continue working, anyway it will not be possible to package these modules as obx files till they are fixed.

Below it is listed the complete changes and what is the action to be taken to fix modules in each case.

  • Mapping for WAD code
    • Rule: Mapping for WAD windows contains now the module’s mapping for tabs not in core. As this is automatically generated and shouldn’t be manually edited class and mapping tabs in Windows and Tabs window has been set as non editable.
    • Consequence: When updating to the new core version mappings in modules will be automatically updated to the new rule.
    • Action: Export the module with the new automatically generated mapping.
  • Mapping for manual code.
    • Rule: HTML mapping for all manual objects (forms, searchs, reports and processes) must start now with the module’s package. For example, the mapping for a report in a module with package (org.myCompany.moduleTest) could be /org.myCompany.moduleTesr.reports/MyReport.html.
    • Consequence: Old modules not following this rule will still work, but a warning will be displayed whenever the code is compiled. These modules will not be allowed to be packaged in obx files till they are not fixed.
    • Action: The action to be taken to fix modules is to detect the incorrect mappings (it will be shown as a warning when compiling) and adapt them to the new rule.
  • Column.name value
    • Rule: Name attribute in column must follow now the same rules as Database name (columnname) had. This is, when the column is in the same module as its table, no special rule required; if it is in another module, it must start by EM_ + the module’s db_prefix.
    • Consequence: This rule has been enforced in through database triggers, making not possible to create or modify existent objects if the mapping is not correct. Anyway, old modules not following this rule will still work, but a warning will be displayed whenever the code is compiled. These modules will not be allowed to be packaged in obx files till they are not fixed.
    • Action: Locate columns not following the naming and change it. Note that this will cause a change in the module’s API, because this value is used by DAL to generate the property in Java. Therefore it will be necessary also to change the Java processes accessing the column with DAL.
  • Database indexes and constraints
    • Rule: Indexes and constraints now must start with the module’s db_prefix if they are in the same module as their table. If they are in a different one, the rule is the same as it was (start by EM_ + db_prefix).
    • Consequence. Now when exporting database (if validate.model property is set to true) a warning will be raised if there are indexes or constraints not following the rule. It will not be allowed to package modules in obx files if they do not follow the rule.
    • Action: Rename indexes and constraints to adapt them to the new rule. Note that it is possible to define messages for constraints, in this way it is possible to display a customized message when the constraint is not satisfied. These message have as Search key value the constraint name, therefore it will be necessary to change them if exist.
  • Reference name
    • Rule: In this case a restriction has been removed. Prior to this change, reference name was unique in the whole database, thus it was possible two different module adding two reference with same name and it was not possible to install both in the same instance. Now, reference name is unique per module, so there is no problem with several modules defining the same name for different references.
    • Consequence: Now name cannot be used to identify references. Therefore constructor for TableComboData shouldn’t be used passing as parameter the reference name, but its ID. This constructor has been changed and when passing name the reference is always looked within core but not in other modules.
    • Action: Review module’s manual code to ensure all TableComboData constructors are called using ID when the reference is not in core.

As addition, all default messages used to be displayed when a constraint is not satisfied have been removed from database as they are automatically managed. This means that hundreds of messages have disappear and it is recommended for those of you maintaining a translation to repackage it again without  all of these messages.

Sorry for all inconveniences this might carry.

Verifying WAD windows before generating them (II)

As explained in my previous post, a new verification has been added before compiling WAD windows to detect possible errors.

The problem has appeared with the “Identifier verification” which forces all the tables used in the tabs to be generated to have at least one column set as identifier. This is strictly mandatory just in case the table is a part of a foreign key, but as now modules expose all their tables as part of their public API, we decided to force all tables to have identifier. But as before it did compile, it is possible there were modules with tables without identifier.

To solve this problem, now the verification does not stop the compilation process in case errors are found, but it is highly recommendable to fix them in your modules as soon as you see them to prevent possible incompatibilities with other modules. In a future core release, this check by default will stop the process, in case it is not successful.

Verifying WAD windows before generating them

Although developing automatic windows in Openbravo ERP is quite straight forward and saves a lot of coding time, in case something goes wrong it can be difficult to find out where the problem is. Of course you have the compilation log, but this is not always as user friendly as it should be. In many occasions, it is quite hard to figure out the root cause for the error. It must be inferred from a ton of lines of log and some times it fails in a place that it is not expected, for example a missing identifier for a table can cause a SQL error.

Currently we are working on improving the build process, and one of the improvements we are putting in place (it is already pushed to pi) is a verifier that is run before generating WAD windows, this verifier will check a number of common mistakes that make the tabs not to be properly generated and will display a clear message about this stopping the process.

The idea is to gradually include new checks to this verifier, now we just look for tables without identifier and for tables without primary key. Any feedback on which checks would be useful is welcome.

I hope this makes life a little bit easier to Openbravo ERP developers.

Single Record UI pattern

Single record UI pattern has been recently added to Openbravo ERP r2.50 development branch (pi). This new pattern allows to define a tab as update only not allowing new record insertions nor deletions. This is useful for some special tabs that show information which the user can edit but not modify or create new records, usually the number of record is fixed or it is created by a process but not directly in the tab. An example for this is the System Information tab, which shows global information for the system, therefore it makes sense to change some of its values but never to create a new record; a different case where this pattern is now used is in the Business Partner > Customer sub tab, when the Business Partner is a customer this tab contains the information related to this customer, records in this tab shouldn’t be directly created because they must be created in the parent one.

To implement this pattern a new concept has been added to the tab definition: UI Pattern. Each tab has a single UI pattern that can be selected among the values in a new drop down list.

Currently there are three patterns:

  • Standard. It is the usual representation that allows creating, modifying and deleting records.
  • Read Only. It only allows to view the information but not to modify it. This pattern is not new in Openbravo ERP, but it has changed the way to define it. Previously there was a boolean value that set the tab to be read only, now that field has been deprecated and it is defined as a pattern in a new drop down list of values.
  • Single Record.Which is the one described in this post.

Update: This feature will be included within Openbravo ERP 2.50 MP3

New document: database model

Currently we are working on the Developers Guide for Openbravo ERP r2.50. Within these efforts, last week we have published the database model documentation. This documentation is automatically generated from the application’s on line help, and consists in the description for all tables in database and their columns. It is structured in Database_Model/Package/Table, so each table is included in its package chapter, the information for the columns in the table is included as sections in the table’s page.

The aim for all this, is not to have a readable document from head to bottom but to have a easily maintainable reference to be linked from any other document in the wiki, our goal is also to improve on line help and thus, enhance in parallel this document.

If you have any comment on this document: what you like/dislike, what would you include or improve, etc. please let me know and we’ll try to add this feedback.

EDITED on 4-7: This document replaces the Openbravo ERP ER published for previous releases.

Using Mercurial’s bisect extension to find bugs

One week ago Openbravo ERP code was moved from Subversion to Mercurial. I am completely new to Mercurial and to distributed SCMs since I always worked with Subversion but, apart from the new concepts it incorporates, the transition was very smooth, at least till the moment. I’ve spent some time during the last days looking the extensions Mercurial has and, for me, one of the nicest ones is bisect. Bisect can be very useful to find the changeset when a bug was introduced in the code.

A real example

Recently I was assigned this bug. I discovered that it was not present in  r2.40 but it was in development branch, furthermore, I find out the bug was caused because a line had been removed from the code. At this point I wanted to know which commit removed that line, just to know if it was a mistake or it was done on purpose trying to fix another bug, so the tedious work started: given two revisions one that has the bug (head of development branch) and another one that has not it (r2.40 tag) try different revisions in between to find which one removed the line that causes the bug. This is not only tedious but also very time consuming.

A good solution: bisect

Bisect is an extension for Mercurial that makes this kind of work much faster. Bisect’s behavior is pretty simple, you tell it the good and bad changesets and it updates your working copy to another one between them, then you can test if in that one the bug is present and you mark it as good or bad, then the process is run again until it finds the changeset that introduces the bug.  In fact bisect just decides for you which is the next changeset to test in. It sounds not to be a very high improvement, but if you combine it with some simple (at least in some occasions) automated test the results can be awesome.

Let me explain it through a simple example:

  • First prepare the environment: a file with a lot of lines, and a commit somewhere there removing a line which we’ll look for afterwards.
$ hg init testBisect
$ cd testFile
$ cat testFile
This is
a file
with some feature
and this
line here
is needed to work fine
$ hg ci -A -m "init file"
adding testFile
$   for (( i = 0; i < 335; i++ )); do echo "line"$i >> testFile; hg commit -m "change here"; done
$ sed -i 's/line here//' testFile
$ hg ci -m "this commit is buggy"
$ for (( i = 0; i < 872; i++ )); do      echo "line"$i >> testFile;      hg commit -m "change here";      done
$ hg parents
changeset:   1208:7568a581b554
tag:         tip
user:        Asier Lostalé
date:        Mon Mar 02 11:13:39 2009 +0100
summary:     change here
  • Now we have 1208 changests! Let’s make the script to decide whether a revision is buggy or not and to continue looking in case it is not:
$  cat test1.sh
#!/bin/sh
MIN_ARGS=2
if [ $# -lt $MIN_ARGS ]; then
  echo "Usage: $(basename $0) FILE TEXT_TO_FIND" >&2
  exit 1
fi
FILE=$1
shift
TEXT_TO_FIND=$*
check() {
   grep -q "$TEXT_TO_FIND" $FILE && RESULT=good || RESULT=bad
   echo $RESULT

   hg bisect --$RESULT
}
while :
do
  if check | grep -q 'Testing changeset'
then
  echo
  hg bisect
else
  hg bisect
  exit 0
fi
done
  • Now we are ready to start testing, first of all reset bisect and tell it which is the bad and good known revisions. Bad is current one and good is the first one.
$ hg bisect --reset
$ hg bisect --bad
$ hg bisect --good 1
Testing changeset 604:9d6a42635e81 (1207 changesets remaining, ~10 tests)
1 files updated, 0 files merged, 0 files removed, 0 files unresolved
  • Finally just execute the test to find out who removed the line.
$ time ./test1.sh testFile 'line here'
Testing changeset 302:132a5339324e (603 changesets remaining, ~9 tests)
0 files updated, 0 files merged, 0 files removed, 0 files unresolved
Testing changeset 453:aa92eb899545 (302 changesets remaining, ~8 tests)
0 files updated, 0 files merged, 0 files removed, 0 files unresolved
Testing changeset 377:5c8e69bdb1ce (151 changesets remaining, ~7 tests)
0 files updated, 0 files merged, 0 files removed, 0 files unresolved
Testing changeset 339:05f7bb18e505 (75 changesets remaining, ~6 tests)
0 files updated, 0 files merged, 0 files removed, 0 files unresolved
Testing changeset 320:3107aee2dbd2 (37 changesets remaining, ~5 tests)
0 files updated, 0 files merged, 0 files removed, 0 files unresolved
Testing changeset 329:0d907ee53cdb (19 changesets remaining, ~4 tests)
0 files updated, 0 files merged, 0 files removed, 0 files unresolved
Testing changeset 334:8a0d38375333 (10 changesets remaining, ~3 tests)
0 files updated, 0 files merged, 0 files removed, 0 files unresolved

Testing changeset 336:dc2037e24dfc (5 changesets remaining, ~2 tests)
0 files updated, 0 files merged, 0 files removed, 0 files unresolved
Testing changeset 335:939ca611ae0f (2 changesets remaining, ~1 tests)
0 files updated, 0 files merged, 0 files removed, 0 files unresolved
The first bad revision is:
changeset:   336:dc2037e24dfc
user:        Asier Lostalé
date:        Mon Mar 02 11:11:52 2009 +0100
summary:     this commit is buggy
real    0m1.374s
user    0m1.128s
sys    0m0.204s

And we are done: in less than 1.5s we know which is the commit that removed the line!

Though this example is quite theoretical I think bisect is a very good solution for this kind of searches. Do you have experience with this extension? Any comment about it is welcome.